Go to Posts > Add New, enter your content, add categories/tags, and click Publish.
Creating a blog post in WordPress is one of the easiest and most effective ways to share your knowledge, boost SEO, and engage your audience. Whether you’re a beginner or a business owner, this step-by-step guide will walk you through everything you need to know to publish your first WordPress blog post.
✅ Prerequisites:
- A working WordPress website (hosted or self-hosted)
- Admin or Editor access to your dashboard
- Basic understanding of text and images
🛠️ Step 1: Log in to Your WordPress Dashboard
🔑 URL to access:yourdomain.com/wp-admin
📸 Image Tip: Include a screenshot of the WordPress login screen
Enter your Username/Email and Password, then click Login.
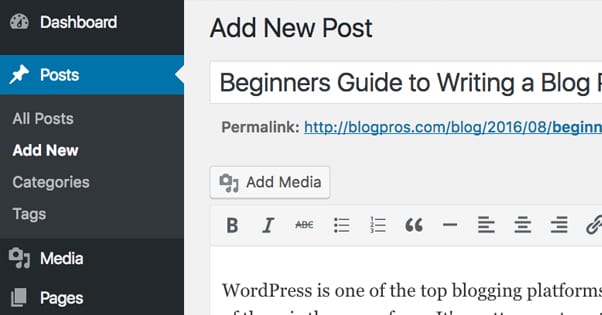
📝 Step 2: Go to “Posts” → Add New
In your WordPress dashboard:
- Hover over Posts
- Click on Add New
📸 Image Tip: Show the WordPress dashboard sidebar highlighting “Posts” and “Add New”
This will open the WordPress Block Editor (Gutenberg).
✍️ Step 3: Enter the Blog Title
At the top, you’ll see a field that says “Add title”.
This is where you enter the name of your blog post.
🎯 Example: “10 Easy Tips to Improve WordPress Website Speed”
📸 Image Tip: Highlight the title field in the Gutenberg editor
🧱 Step 4: Start Writing Content Using Blocks
Below the title, you’ll begin writing your blog content. WordPress uses a block editor, which means you can insert:
- 📝 Paragraph blocks for text
- 🖼️ Image blocks
- 🎥 Video blocks
- 🔗 Buttons or Links
- 🗂️ Lists, Quotes, and Headings
Click the ➕ icon or simply start typing to add a Paragraph Block.
📸 Image Tip: Show adding a paragraph block and inserting content
💡 Pro Tip: Use H2 headings for main sections, H3 for sub-sections, and keep paragraphs short and scannable.
🖼️ Step 5: Add Images to Your Post
Click on the “+” icon → Choose Image Block
You can:
- Upload from your computer
- Choose from your Media Library
- Insert from a URL
📸 Image Tip: Screenshot showing the image block and media library
🎯 Don’t forget to add ALT text for SEO and accessibility.
🔍 Step 6: Use Categories and Tags
On the right sidebar, click on the Post tab. Scroll down to:
- Categories: Organize your content (e.g., Blog, Tutorials, SEO)
- Tags: Add keywords related to your article
📸 Image Tip: Highlight the Categories & Tags sections in the sidebar
🖋️ Step 7: Set a Featured Image
This is the thumbnail that appears on blog listings and social media shares.
- Go to the right sidebar → Featured Image
- Click Set featured image → Upload or choose one
📸 Image Tip: Show where to set a featured image
📌 Choose a clear, relevant image that represents your post.
🚀 Step 8: Publish Your Blog Post
Once your content looks good:
- Click the Preview button to see how it looks
- Click the Publish button (top right)
📸 Image Tip: Screenshot of the Publish button and confirmation popup
🎉 Congratulations! Your WordPress blog post is now live.
✅ Bonus Tips for a Great Blog Post
- ✔️ Use bullet points and numbered lists to improve readability
- ✔️ Add internal links to your other posts or pages
- ✔️ Embed videos for better engagement
- ✔️ Include a Call-to-Action (e.g., Contact us, Subscribe, Read next)
- ✔️ Use an SEO plugin like Yoast SEO or RankMath to optimize your post
📌 Final Thoughts
Blogging with WordPress is powerful and simple. With consistent posts, optimized images, and smart formatting, you can reach more people and grow your brand. If you’re unsure where to start, feel free to reach out to us at WordPressFreelancer.in — we help individuals and businesses create content-ready websites that drive results.

